
Client Punchout Integration

Overview

This document provides technical guidance on how to integrate with our punchout solution using either cXML (Commerce eXtensible Markup Language) or OCI (Open Catalog Interface) protocols from a client's procurement system.

1. cXML Punchout Integration

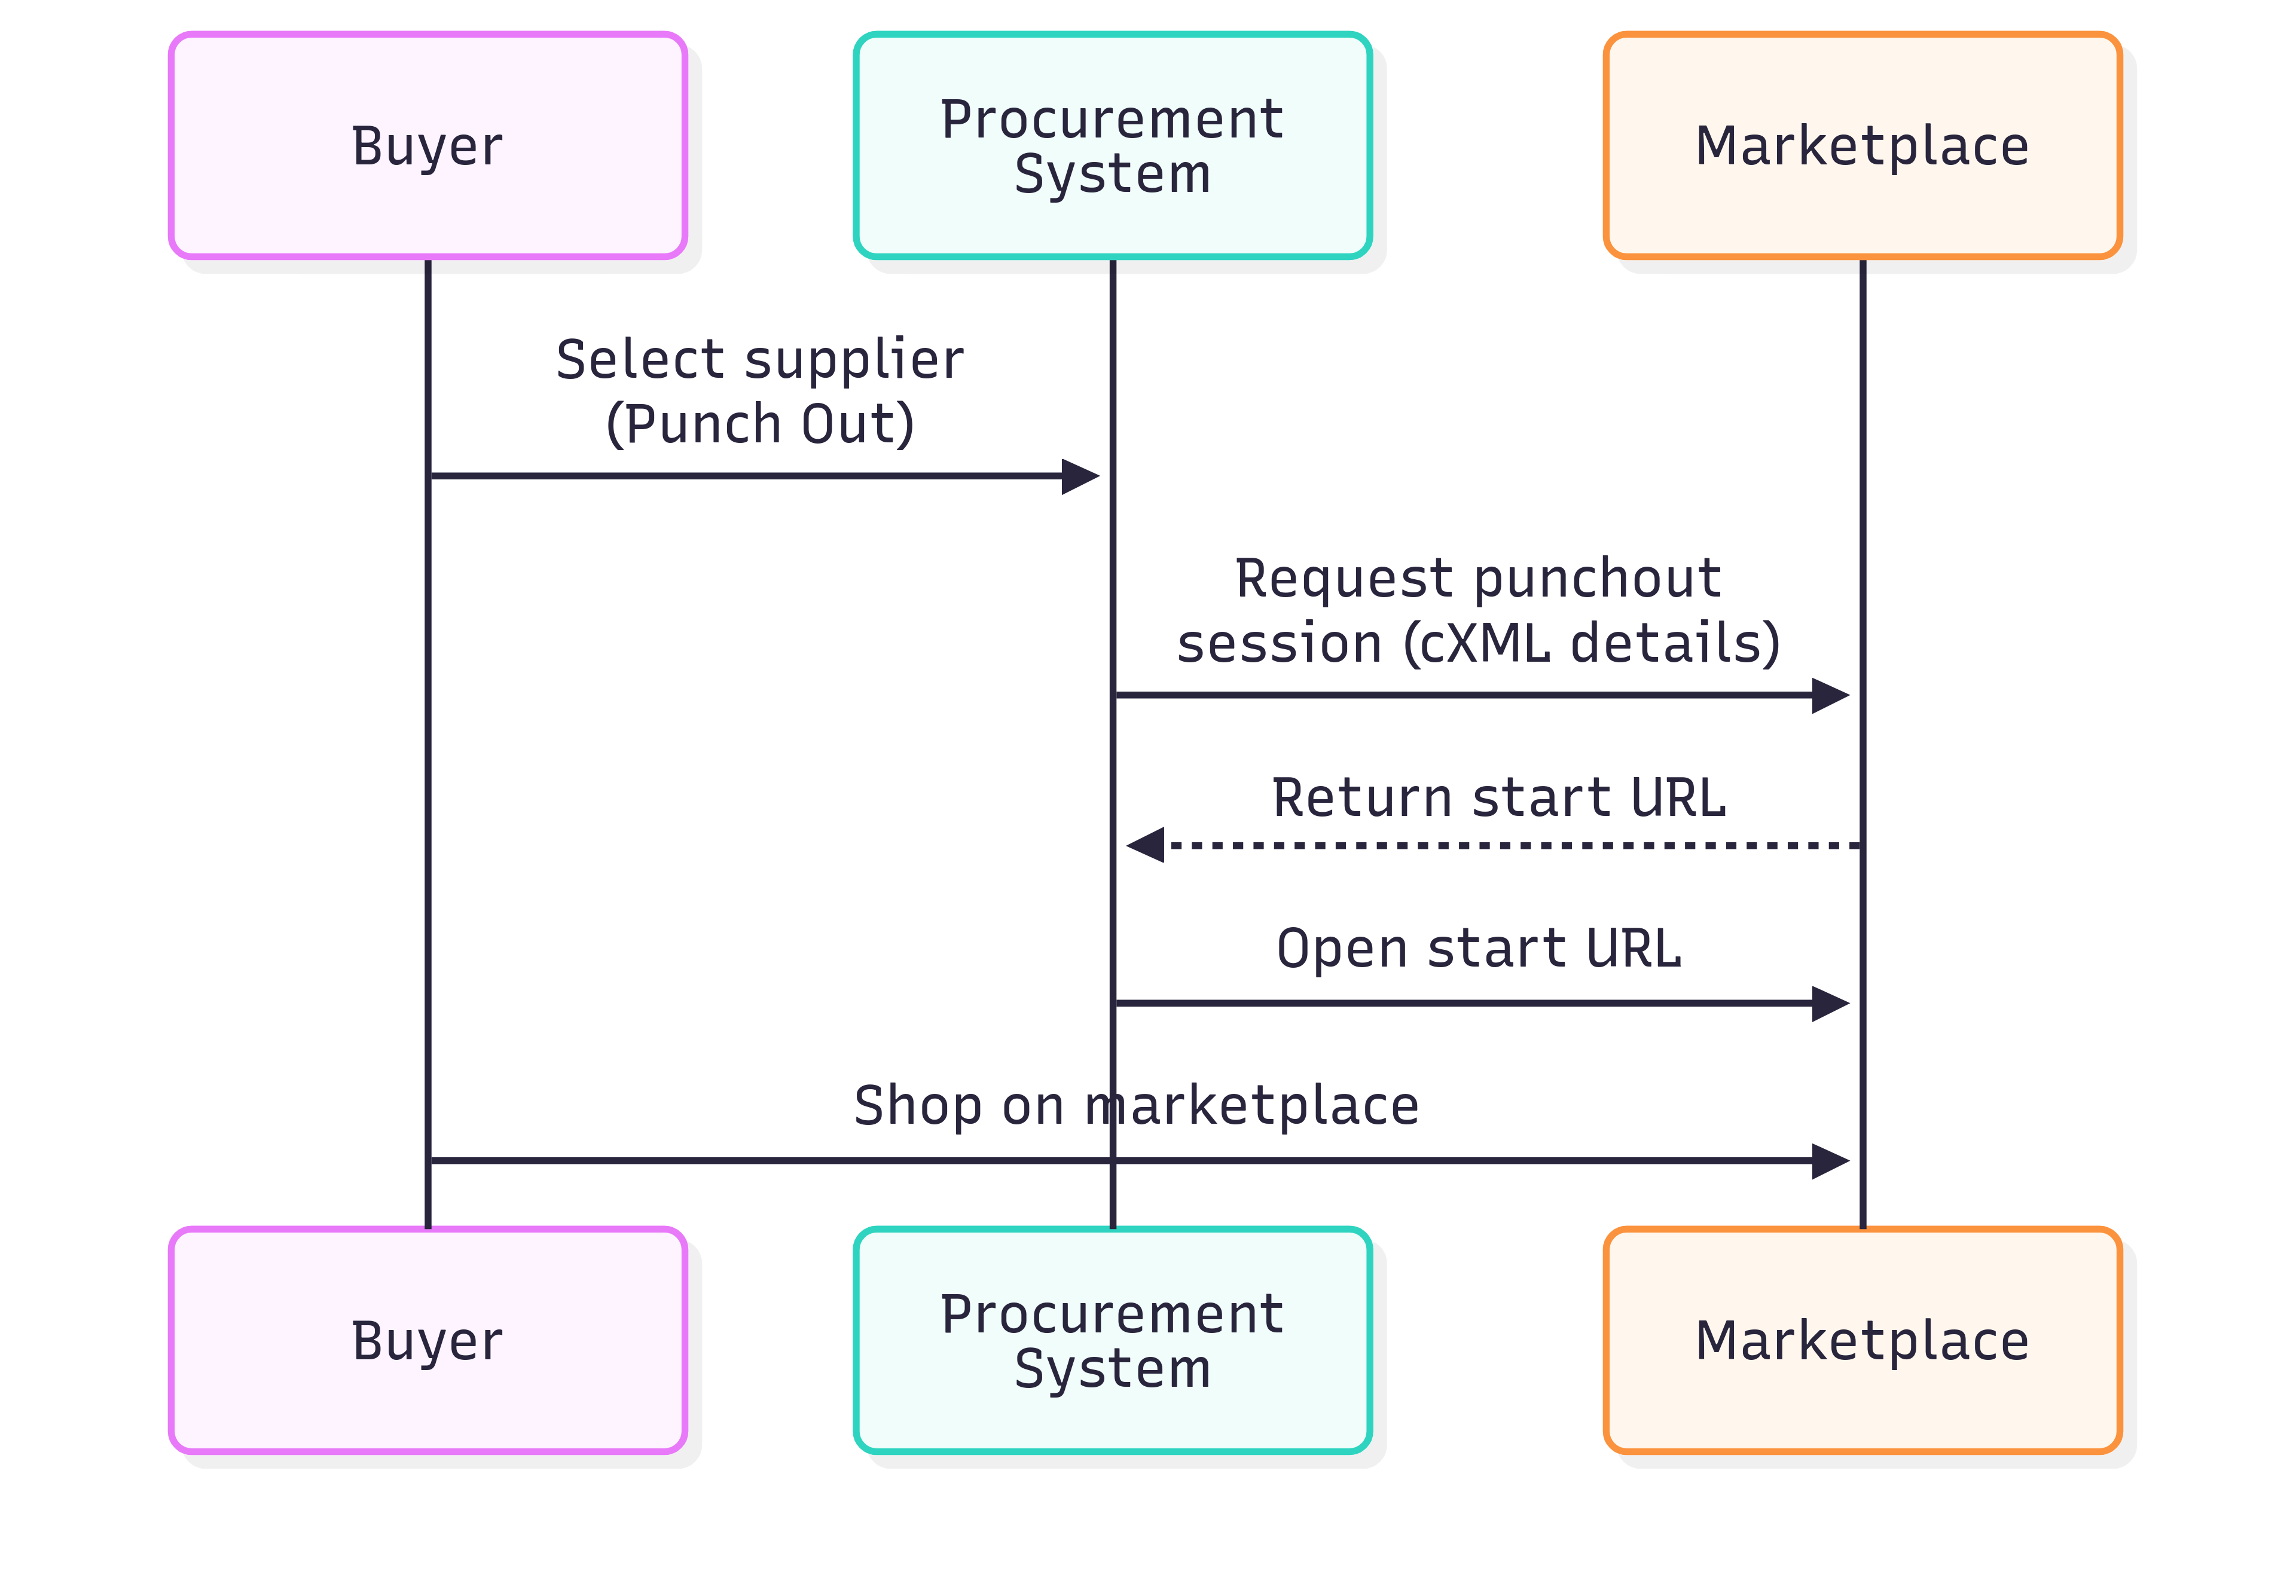
1.1 Setup Request (Initiating a Punchout Session)

Endpoint: POST /api/punchout/setup/cxml

Request Format: XML document conforming to cXML DTD

<?xml version="1.0" encoding="UTF-8"?>
<!DOCTYPE cXML SYSTEM "http://xml.cxml.org/schemas/cXML/1.2.049/cXML.dtd">
<cXML version="1.2.049" xml:lang="en-US" payloadID="[unique-payload-id]" timestamp="[ISO-8601-timestamp]">
<Header>
<From>
<Credential domain="[domain]">
<Identity>[identity]</Identity>
</Credential>
</From>
<To>
<Credential domain="[domain]">
<Identity>[identity]</Identity>
</Credential>
</To>
<Sender>
<Credential domain="[domain]">
<Identity>[identity]</Identity>
<SharedSecret>[shared-secret]</SharedSecret>
</Credential>
<UserAgent>[user-agent]</UserAgent>
</Sender>
</Header>
<Request deploymentMode="[production/test]">
<PunchOutSetupRequest operation="create">
<BuyerCookie>[buyer-cookie]</BuyerCookie>
<Extrinsic name="UserEmail">[user-email]</Extrinsic>
<Extrinsic name="UniqueName">[user-name]</Extrinsic>
<BrowserFormPost>
<URL>[browser-form-post-url]</URL>
</BrowserFormPost>
<ShipTo>
<Address>
<PostalAddress>
<Street>[street]</Street>
<City>[city]</City>
<State>[state]</State>
<PostalCode>[postal-code]</PostalCode>
<Country isoCountryCode="[ISO-country-code]">[country]</Country>
</PostalAddress>
</Address>
</ShipTo>
</PunchOutSetupRequest>
</Request>
</cXML>

Response Format: cXML document

<?xml version="1.0" encoding="UTF-8"?>
<!DOCTYPE cXML SYSTEM "http://xml.cxml.org/schemas/cXML/1.2.049/cXML.dtd">
<cXML version="1.2.049" xml:lang="en-US" payloadID="[generated-payload-id]" timestamp="[ISO-8601-timestamp]">
<Response>
<Status code="200" text="OK"></Status>
<PunchOutSetupResponse>
<StartPage>
<URL>https://punchout.example.com/setup?sid=[session-id]</URL>
</StartPage>
</PunchOutSetupResponse>
</Response>
</cXML>

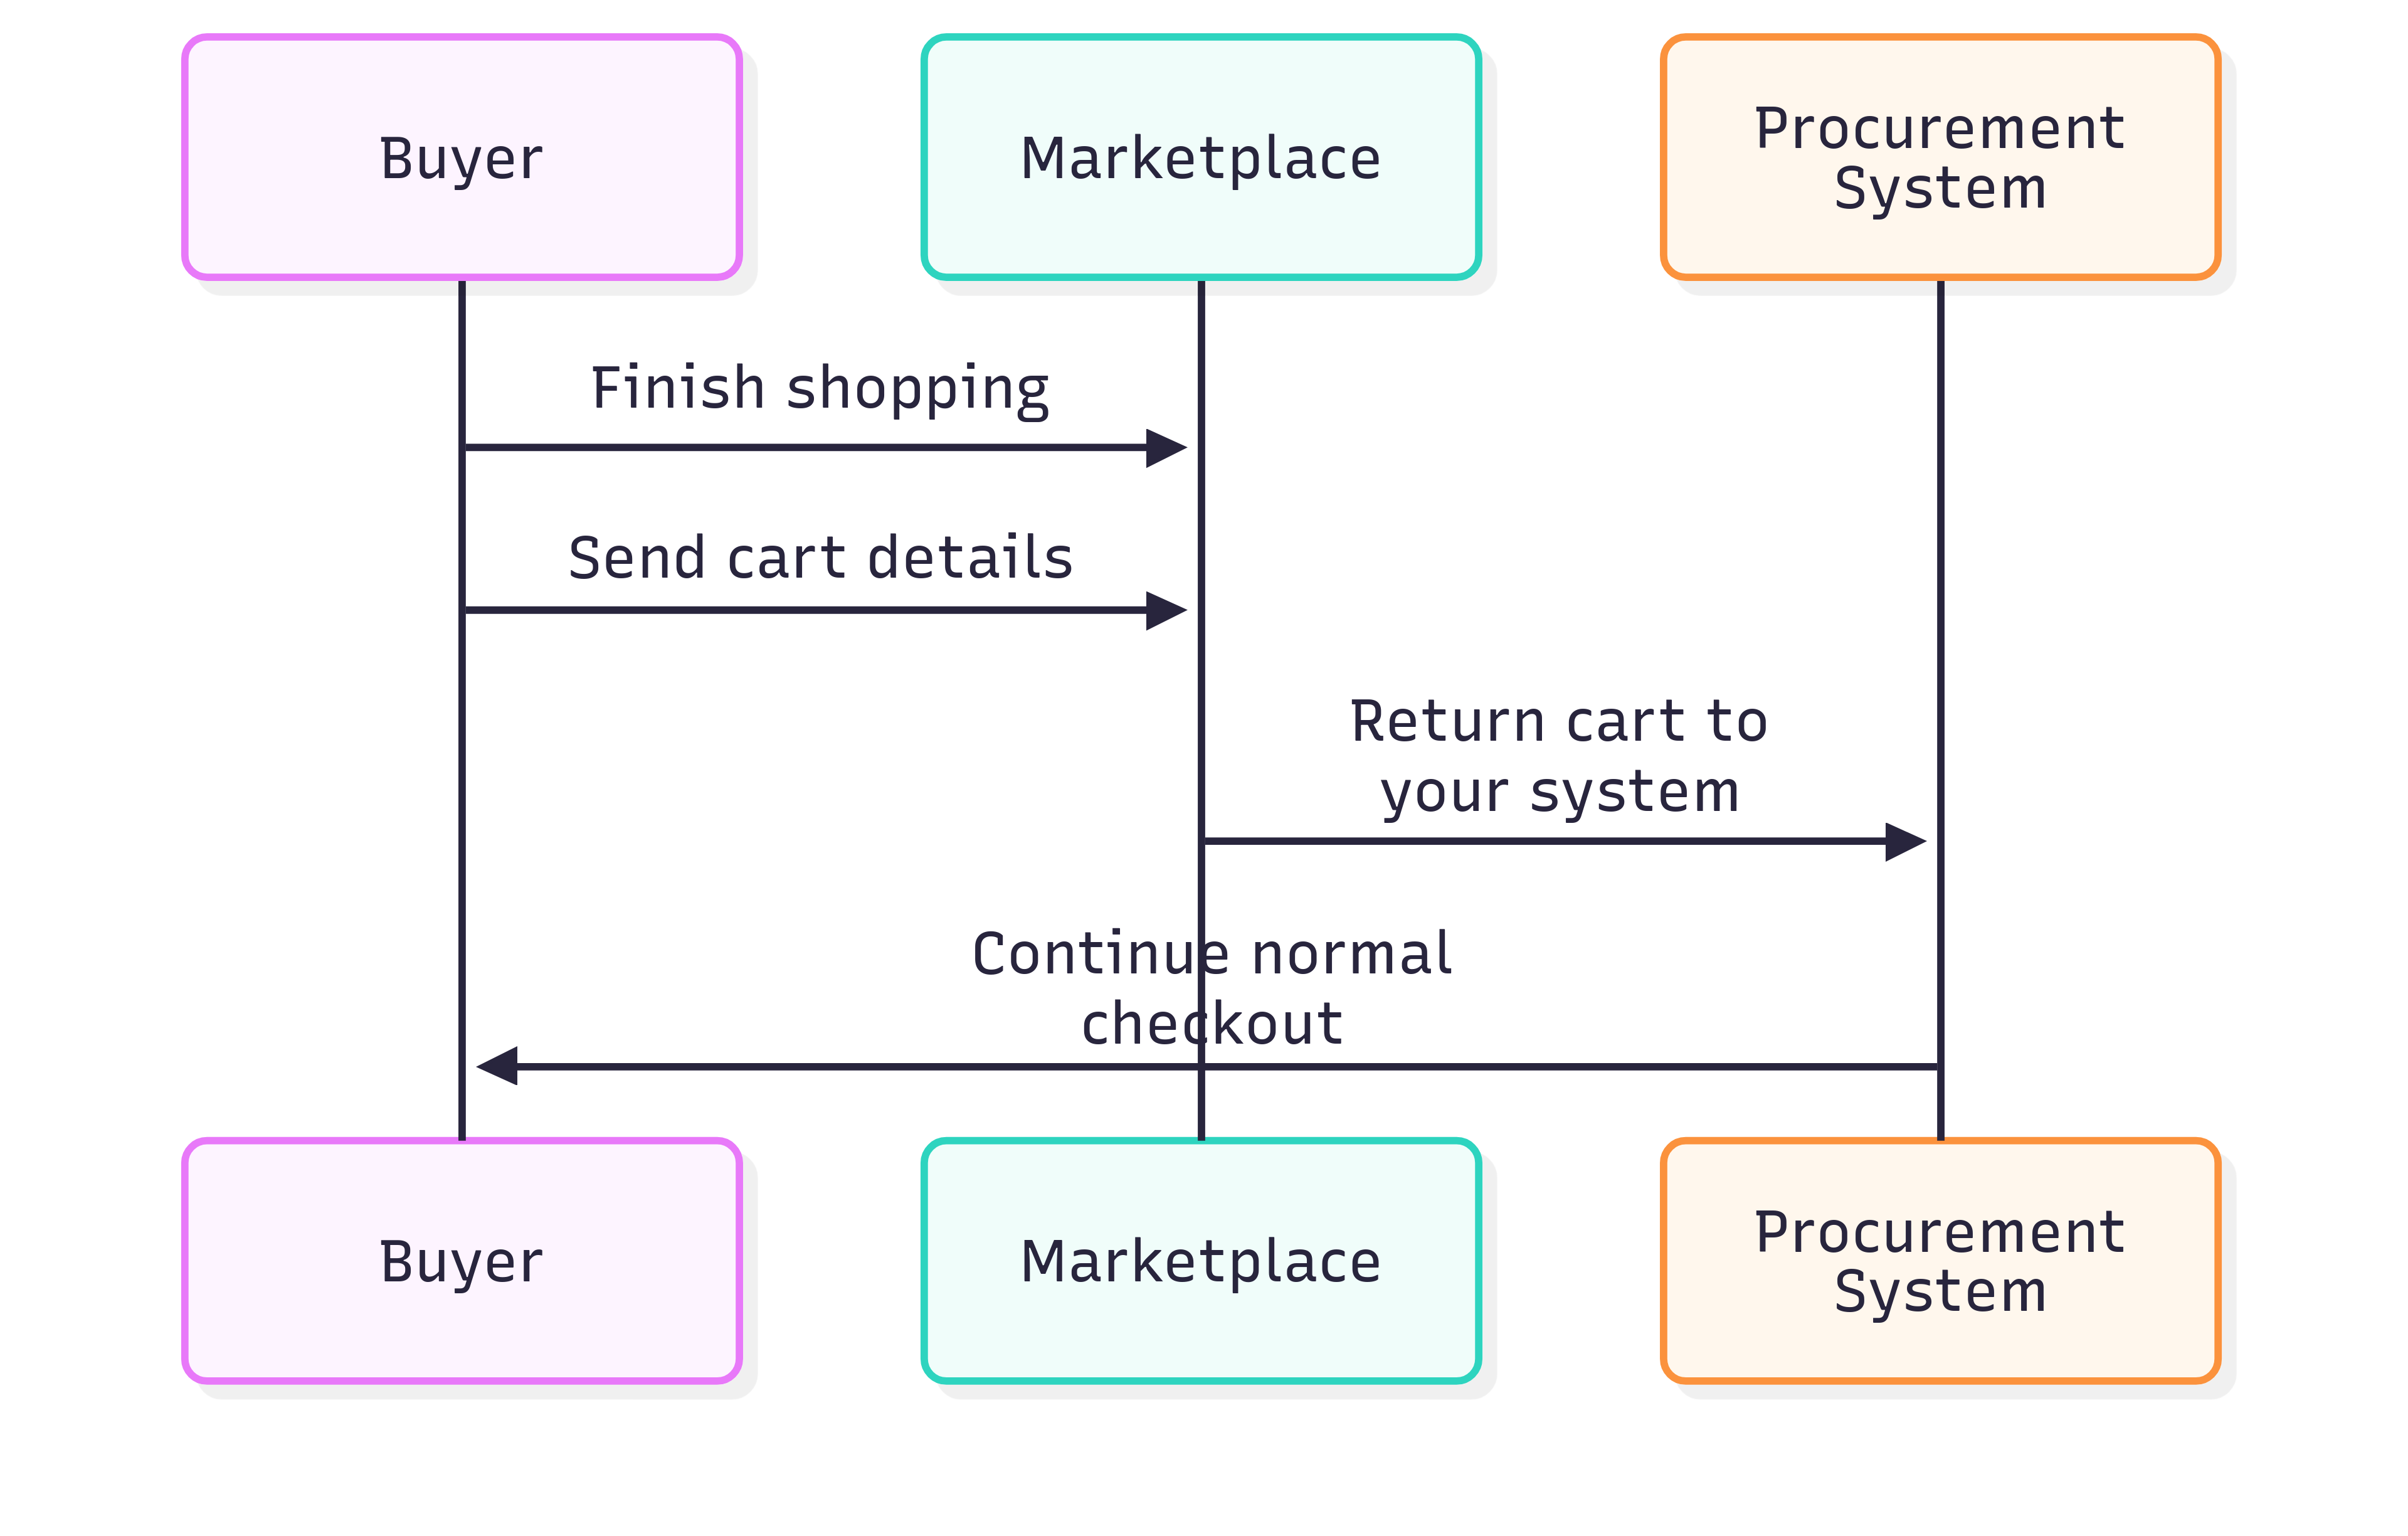
1.2 Checkout/Order Transfer (Return Cart to Procurement System)

When a user completes shopping and proceeds to checkout, our system will automatically:

  1. Generate a cXML PunchOutOrderMessage
  2. POST this message to the URL provided in the BrowserFormPost element during setup

Order Message Format (cXML):

<?xml version="1.0"?>
<!DOCTYPE cXML SYSTEM "http://xml.cxml.org/schemas/cXML/1.2.049/cXML.dtd">
<cXML xml:lang="en-US" payloadID="[payload-id]" timestamp="[ISO-8601-timestamp]">
<Header>
<From>
<Credential domain="[domain]">
<Identity>[identity]</Identity>
</Credential>
</From>
<To>
<Credential domain="[domain]">
<Identity>[identity]</Identity>
</Credential>
</To>
<Sender>
<Credential domain="[domain]">
<Identity>[identity]</Identity>
</Credential>
<UserAgent>[user-agent]</UserAgent>
</Sender>
</Header>
<Message>
<PunchOutOrderMessage>
<BuyerCookie>[buyer-cookie]</BuyerCookie>
<PunchOutOrderMessageHeader operationAllowed="create">
<Total>
<Money currency="[currency-code]">[total-amount]</Money>
</Total>
</PunchOutOrderMessageHeader>
<ItemIn quantity="[quantity]">
<ItemID>
<SupplierPartID>[supplier-part-id]</SupplierPartID>
<SupplierPartAuxiliaryID>[supplier-part-auxiliary-id]</SupplierPartAuxiliaryID>
</ItemID>
<ItemDetail>
<UnitPrice>
<Money currency="[currency-code]">[unit-price]</Money>
</UnitPrice>
<Description xml:lang="en-US">[item-description]</Description>
<UnitOfMeasure>[unit-of-measure]</UnitOfMeasure>
<Classification domain="UNSPSC">[unspsc-code]</Classification>
<LeadTime>[lead-time]</LeadTime>
<Extrinsic name="ImageURL">[image-url]</Extrinsic>
<Extrinsic name="CAS">[cas-number]</Extrinsic>
</ItemDetail>
</ItemIn>
<!-- Additional ItemIn elements for each item in cart -->
</PunchOutOrderMessage>
</Message>
</cXML>

2. OCI Punchout Integration

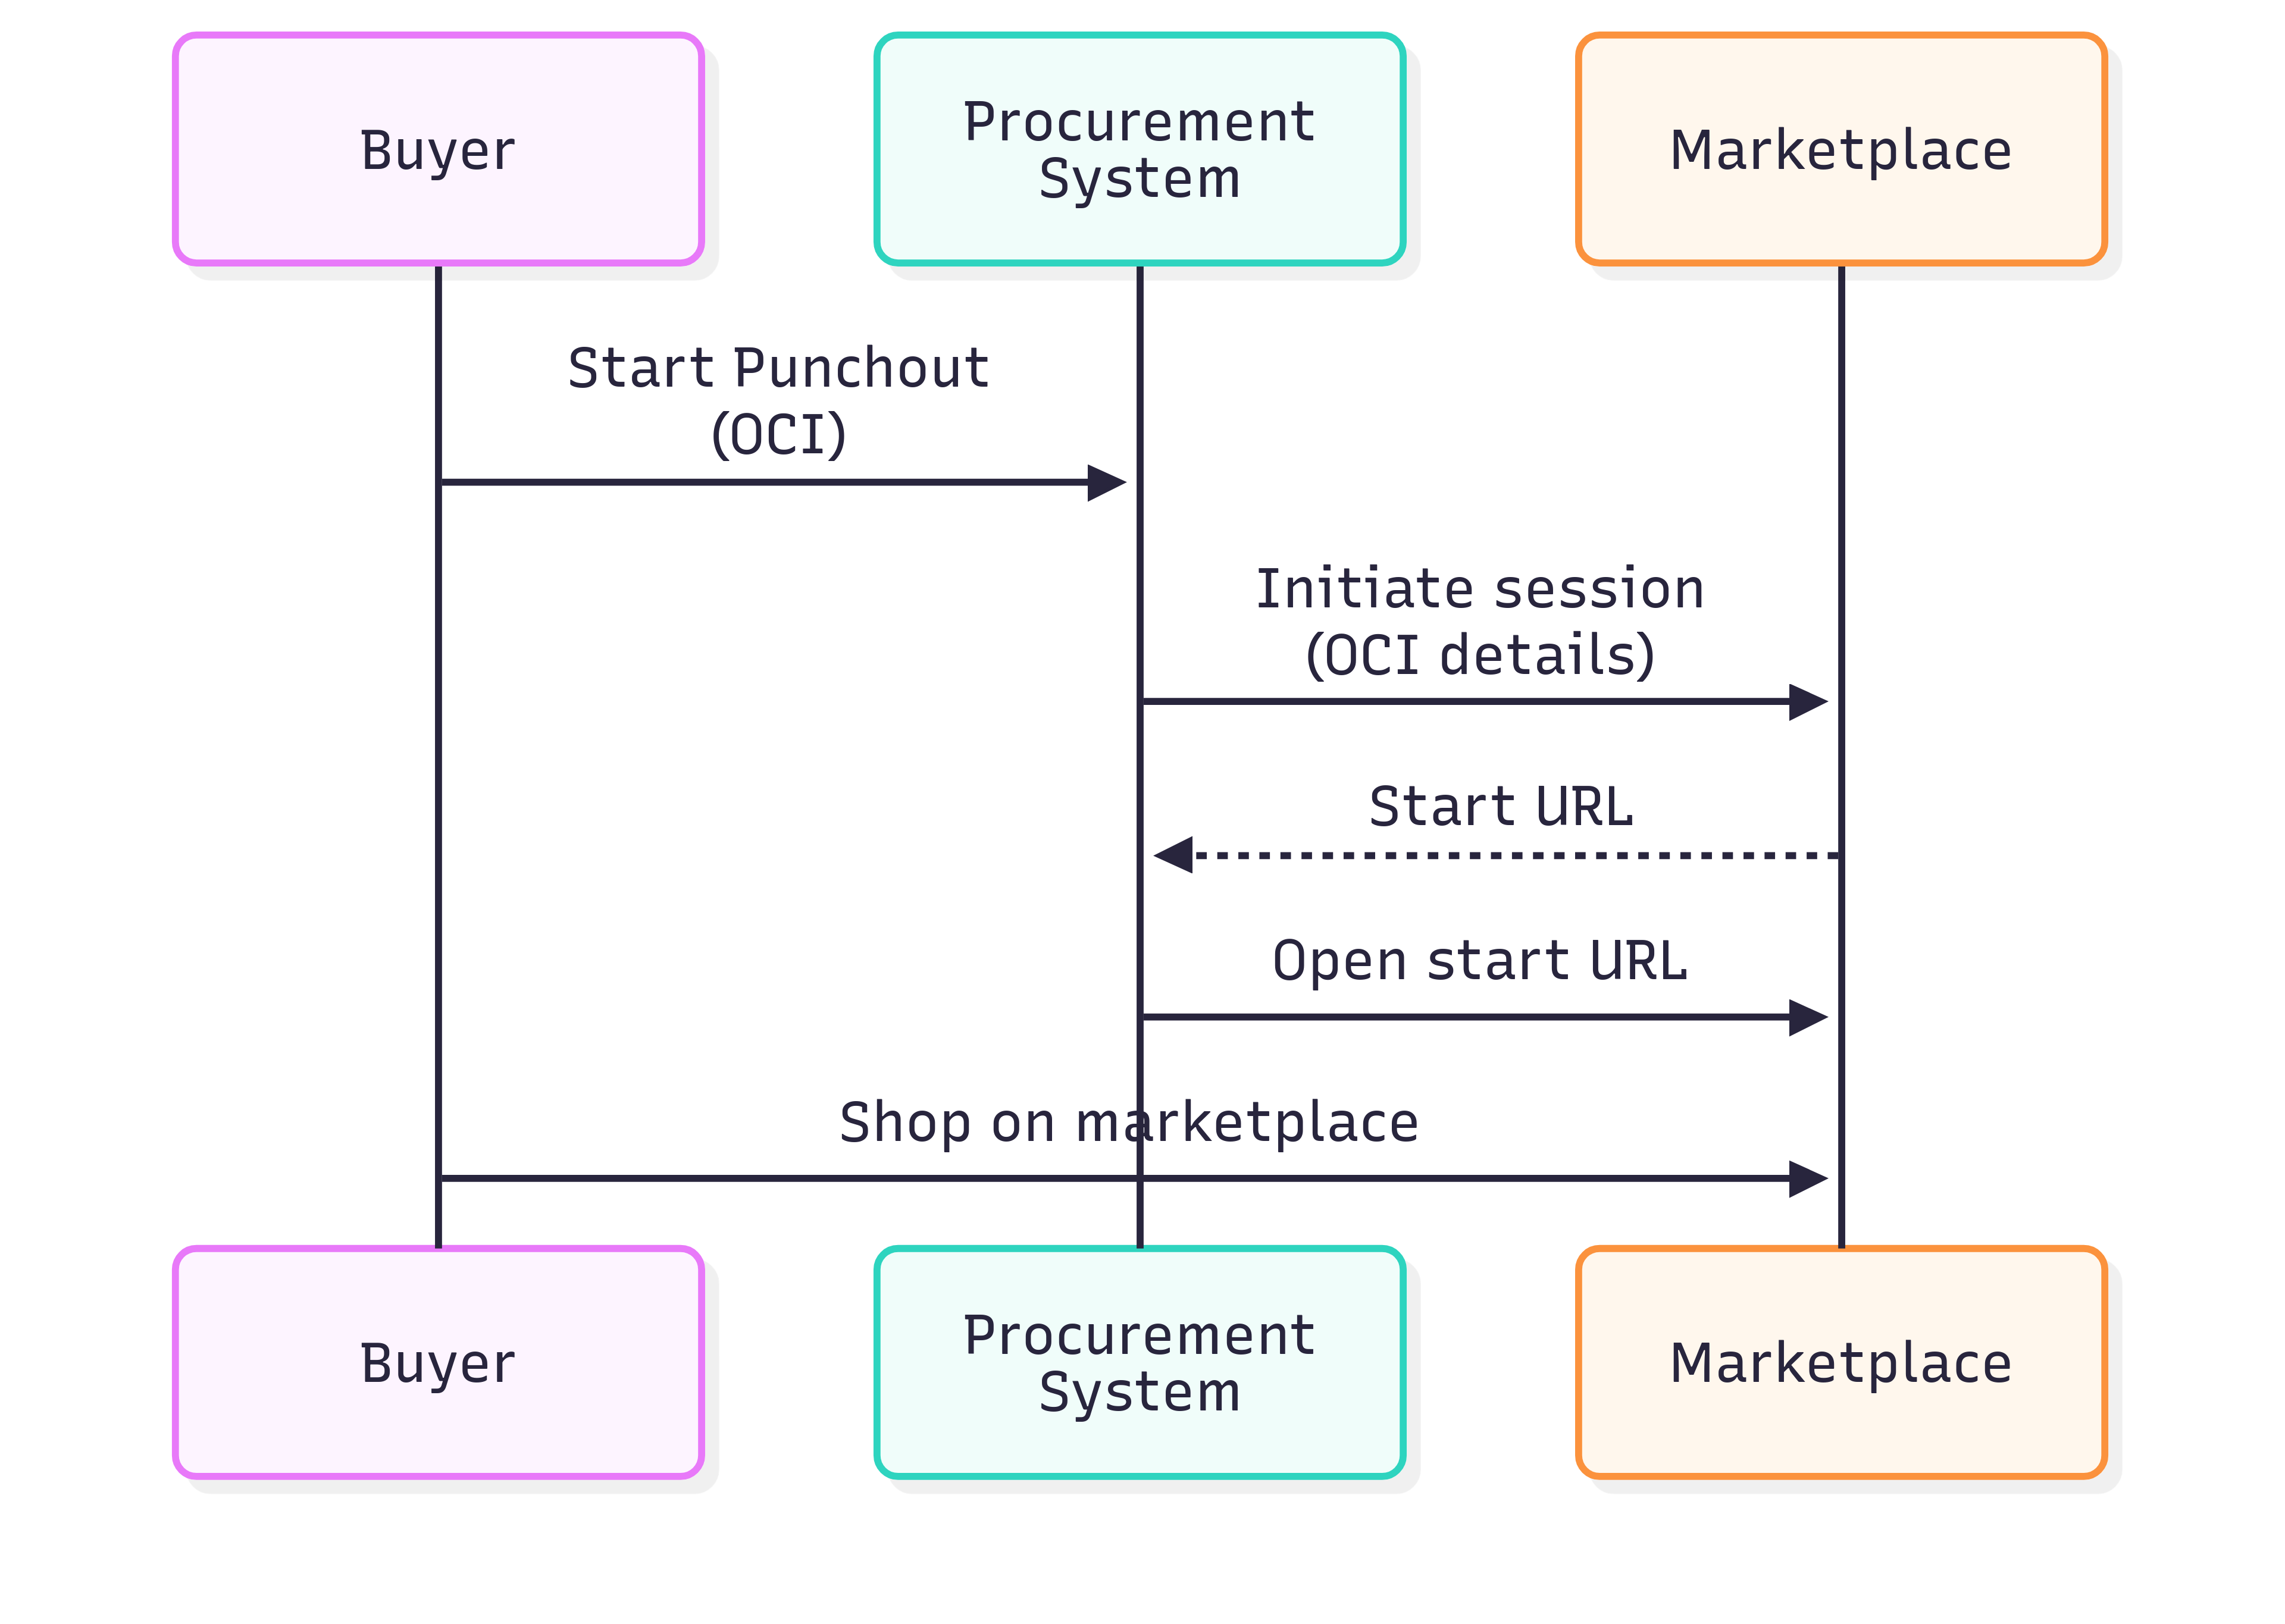
2.1 Setup Request (Initiating a Punchout Session)

Endpoint: GET or POST /api/punchout/setup/oci

Request Parameters:

  • USERNAME: Identity or username (required)
  • PASSWORD: Shared secret (required)
  • EMAIL: User's email address (required)
  • NAME: User's name (required)
  • HOOK_URL: The URL to return cart data to (required)
  • STREET: Street address (required)
  • CITY: City (required)
  • STATE: State/Province (required)
  • COUNTRY: ISO country code (required)
  • POSTALCODE: Postal code (required)
  • CUSTOM_FIELDS: Array of custom field objects each containing:
    • NAME: Custom field name
    • VALUE: Custom field value

Response: The user will be redirected to the supplier's catalog with a valid session.

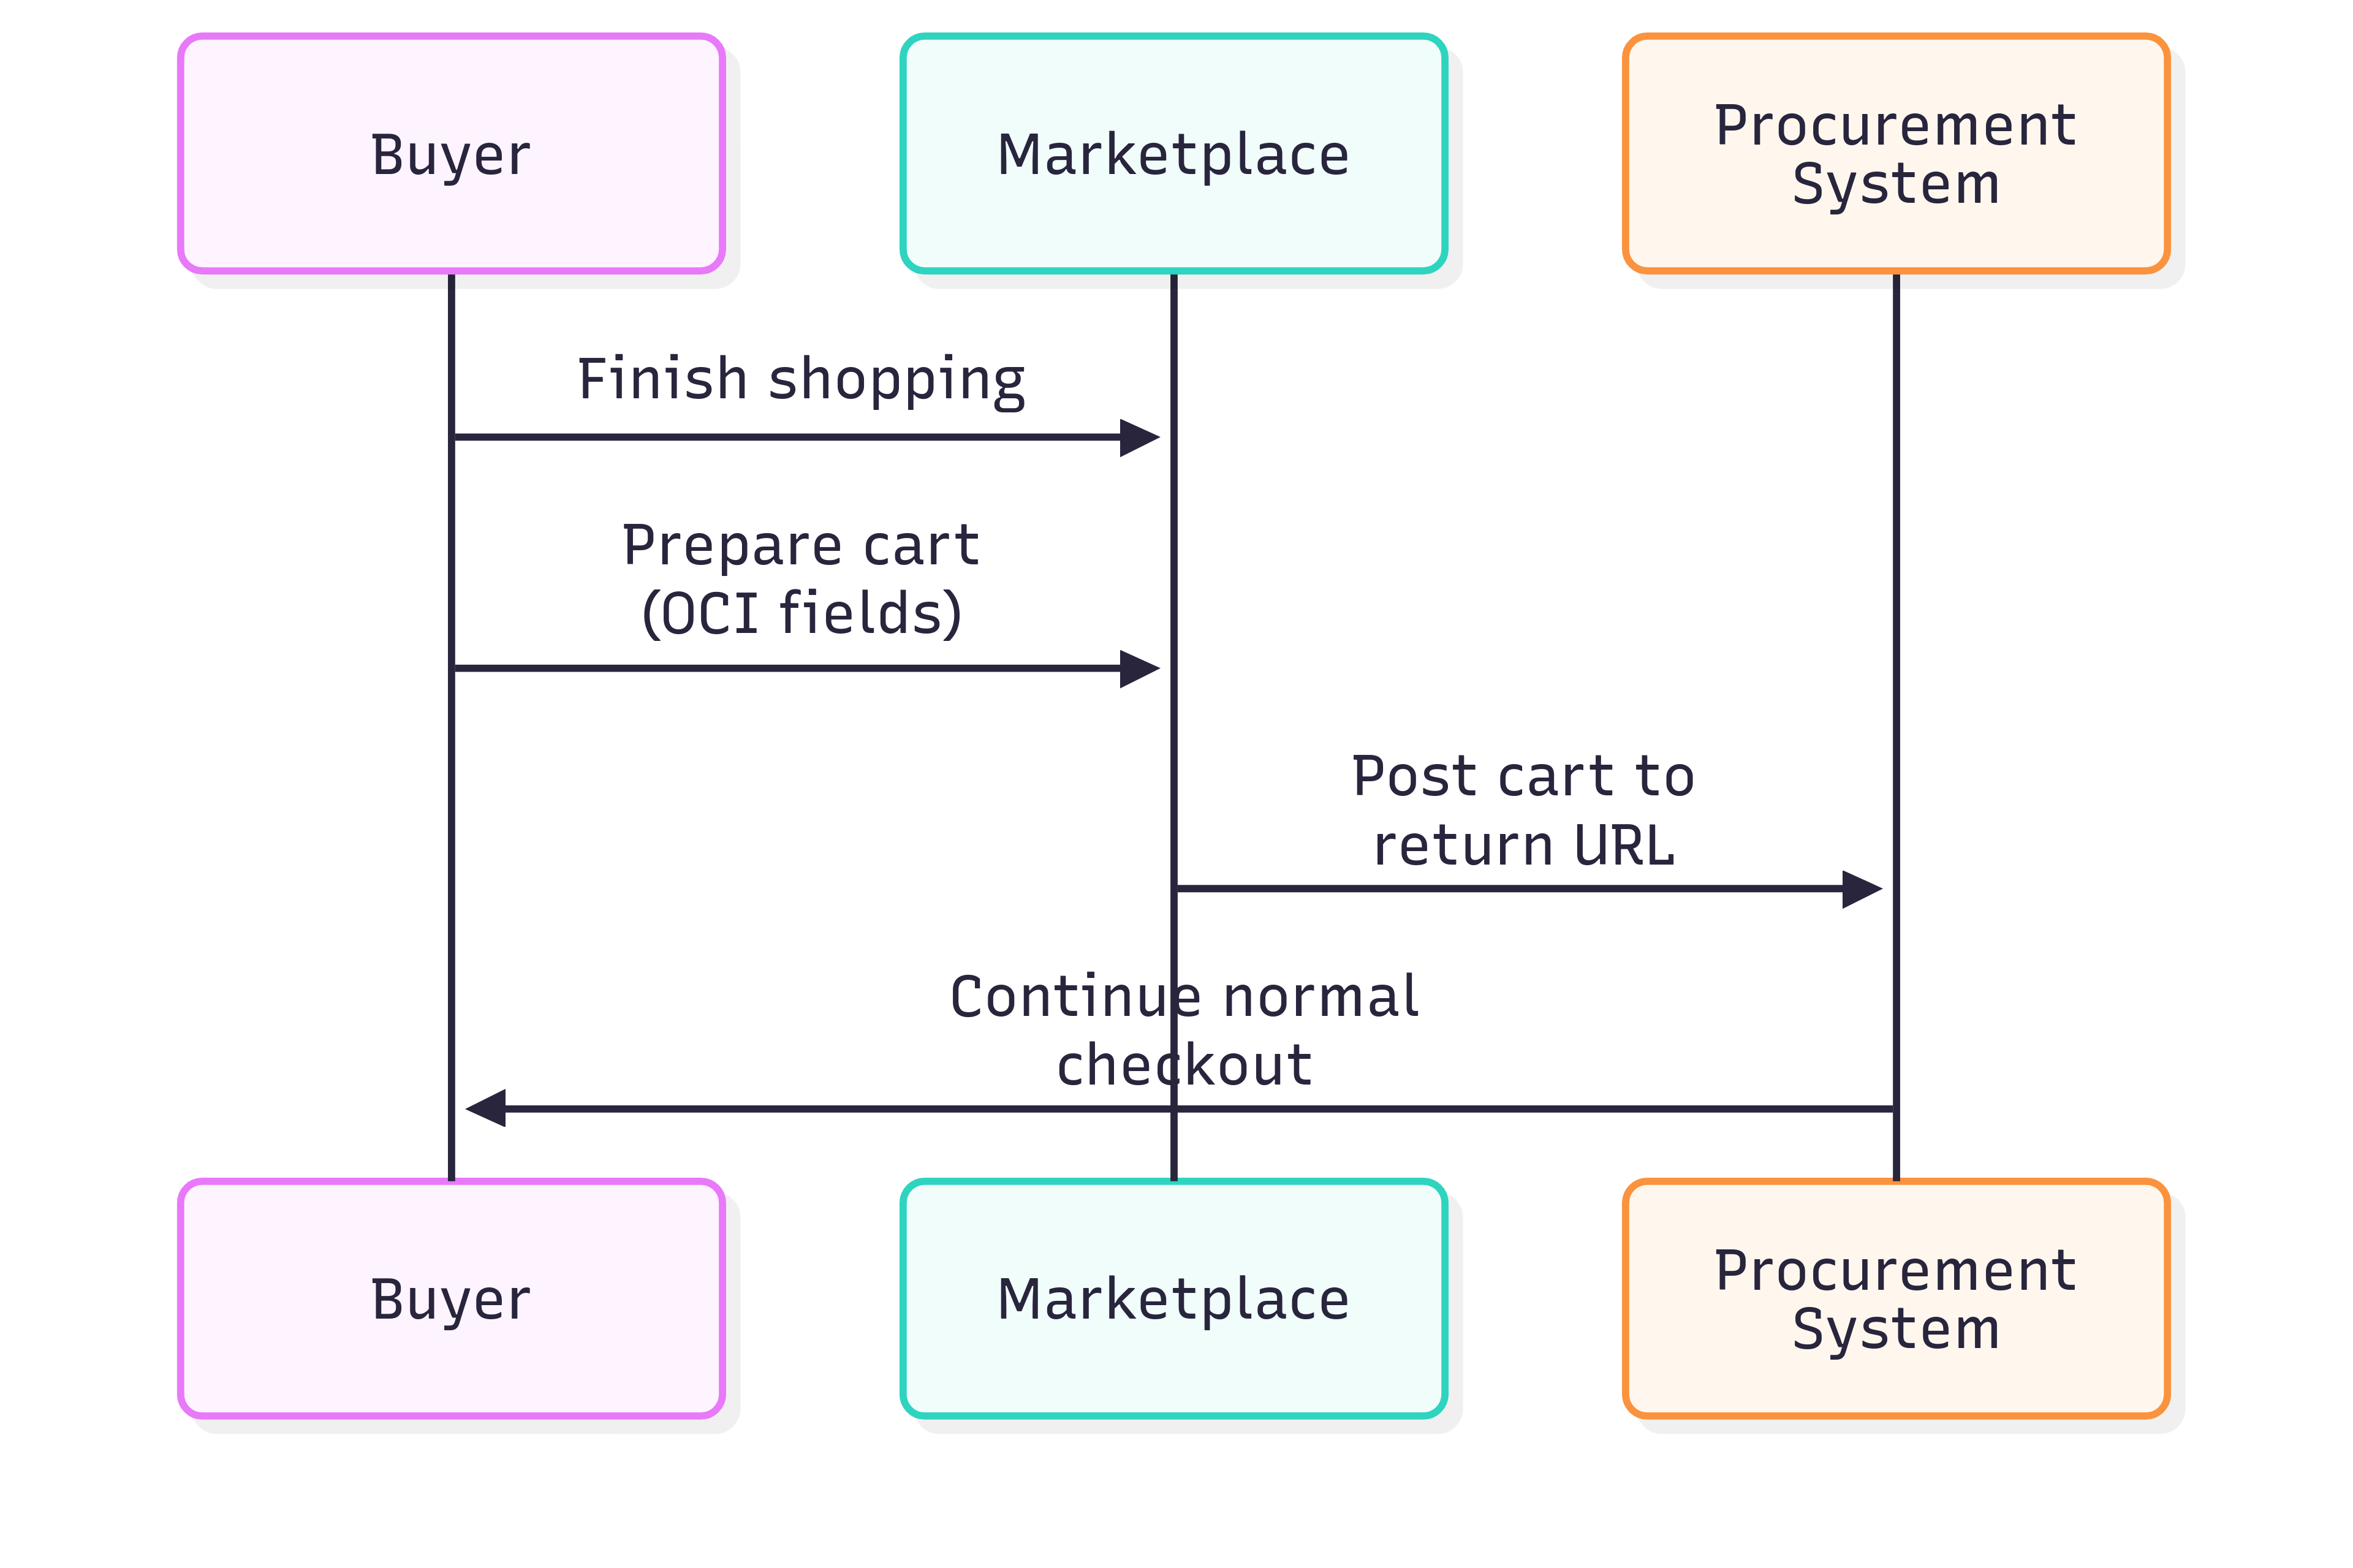
2.2 Checkout/Order Transfer (Return Cart to Procurement System)

When a user completes shopping and proceeds to checkout, our system will automatically:

  1. Generate an HTML form with OCI field data
  2. POST this form to the HOOK_URL provided during setup

OCI Field Format:

NEW_ITEM-DESCRIPTION[n]: Item description
NEW_ITEM-QUANTITY[n]: Item quantity
NEW_ITEM-UNIT[n]: Unit of measure
NEW_ITEM-PRICE[n]: Price per unit
NEW_ITEM-CURRENCY[n]: Currency code (e.g., USD)
NEW_ITEM-VENDORMAT[n]: Supplier part number/SKU
NEW_ITEM-MANUFACTMAT[n]: Manufacturer part number
NEW_ITEM-MATGROUP[n]: Material group
NEW_ITEM-VENDOR[n]: Vendor ID
NEW_ITEM-CONTRACT[n]: Contract number (if applicable)
NEW_ITEM-EXT_SCHEMA_TYPE[n]: Classification schema (e.g., UNSPSC)
NEW_ITEM-EXT_CATEGORY_ID[n]: Classification code
NEW_ITEM-LEADTIME[n]: Delivery lead time

Where [n] is the line item number starting from 1.

3. Integration Workflow

  1. Initiate Punchout:

    • Procurement system sends setup request to the appropriate endpoint (cXML or OCI)
    • Our API validates credentials and creates a punchout session
    • User is redirected to the supplier's catalog
  2. User Shopping Experience:

    • User is authenticated automatically
    • User shops and adds items to cart
    • User proceeds to checkout
  3. Return Cart:

    • Our system generates the appropriate order message (cXML or OCI format)
    • Data is posted back to the procurement system's return URL
    • User is redirected back to procurement system with their cart data

4. Authentication

  • cXML: Authentication is performed via the credentials in the Header section of the cXML document
  • OCI: Authentication is performed via the USERNAME and PASSWORD parameters

5. Error Handling

Both protocols will return appropriate HTTP status codes and error messages:

  • 200: Successful request
  • 400: Bad request (missing required fields)
  • 401: Unauthorized (invalid credentials)
  • 500: Internal server error

For cXML, error responses follow the cXML specification with appropriate Status codes.

6. Setting Up Client Punchout

To set up a client punchout:

  1. Determine which protocol (cXML or OCI) your procurement system supports
  2. Contact our support team to obtain credential information
  3. Configure your procurement system with the appropriate endpoint URLs
  4. Test the integration in a non-production environment first
  5. Once verified, move to production

For additional assistance, please contact our support team.

Last updated on Apr 7, 2025 by aaroncueckermann